INDEX
Introduction.
In my last blog, Mountain hydrangea in the Blue Hour, can we get closer to the blue hour before sunrise and the depths of blue of the mountain hydrangea, which is indigenous to Japan? That was the theme.
Today I will write about monochrome photography during the blue hour.
Bare nature
The photo was taken in a secluded corner of the forest park, a 10-minute walk from my home in the greenbelt.
A leisurely stroll through the park takes about 30 minutes, making this a valuable area within living distance.
Surrounded by trees and surrounded by tranquility, the park with its elevation differences has a playground for children and a fountain pond, and on sunny days, the park is crowded with parents and children.
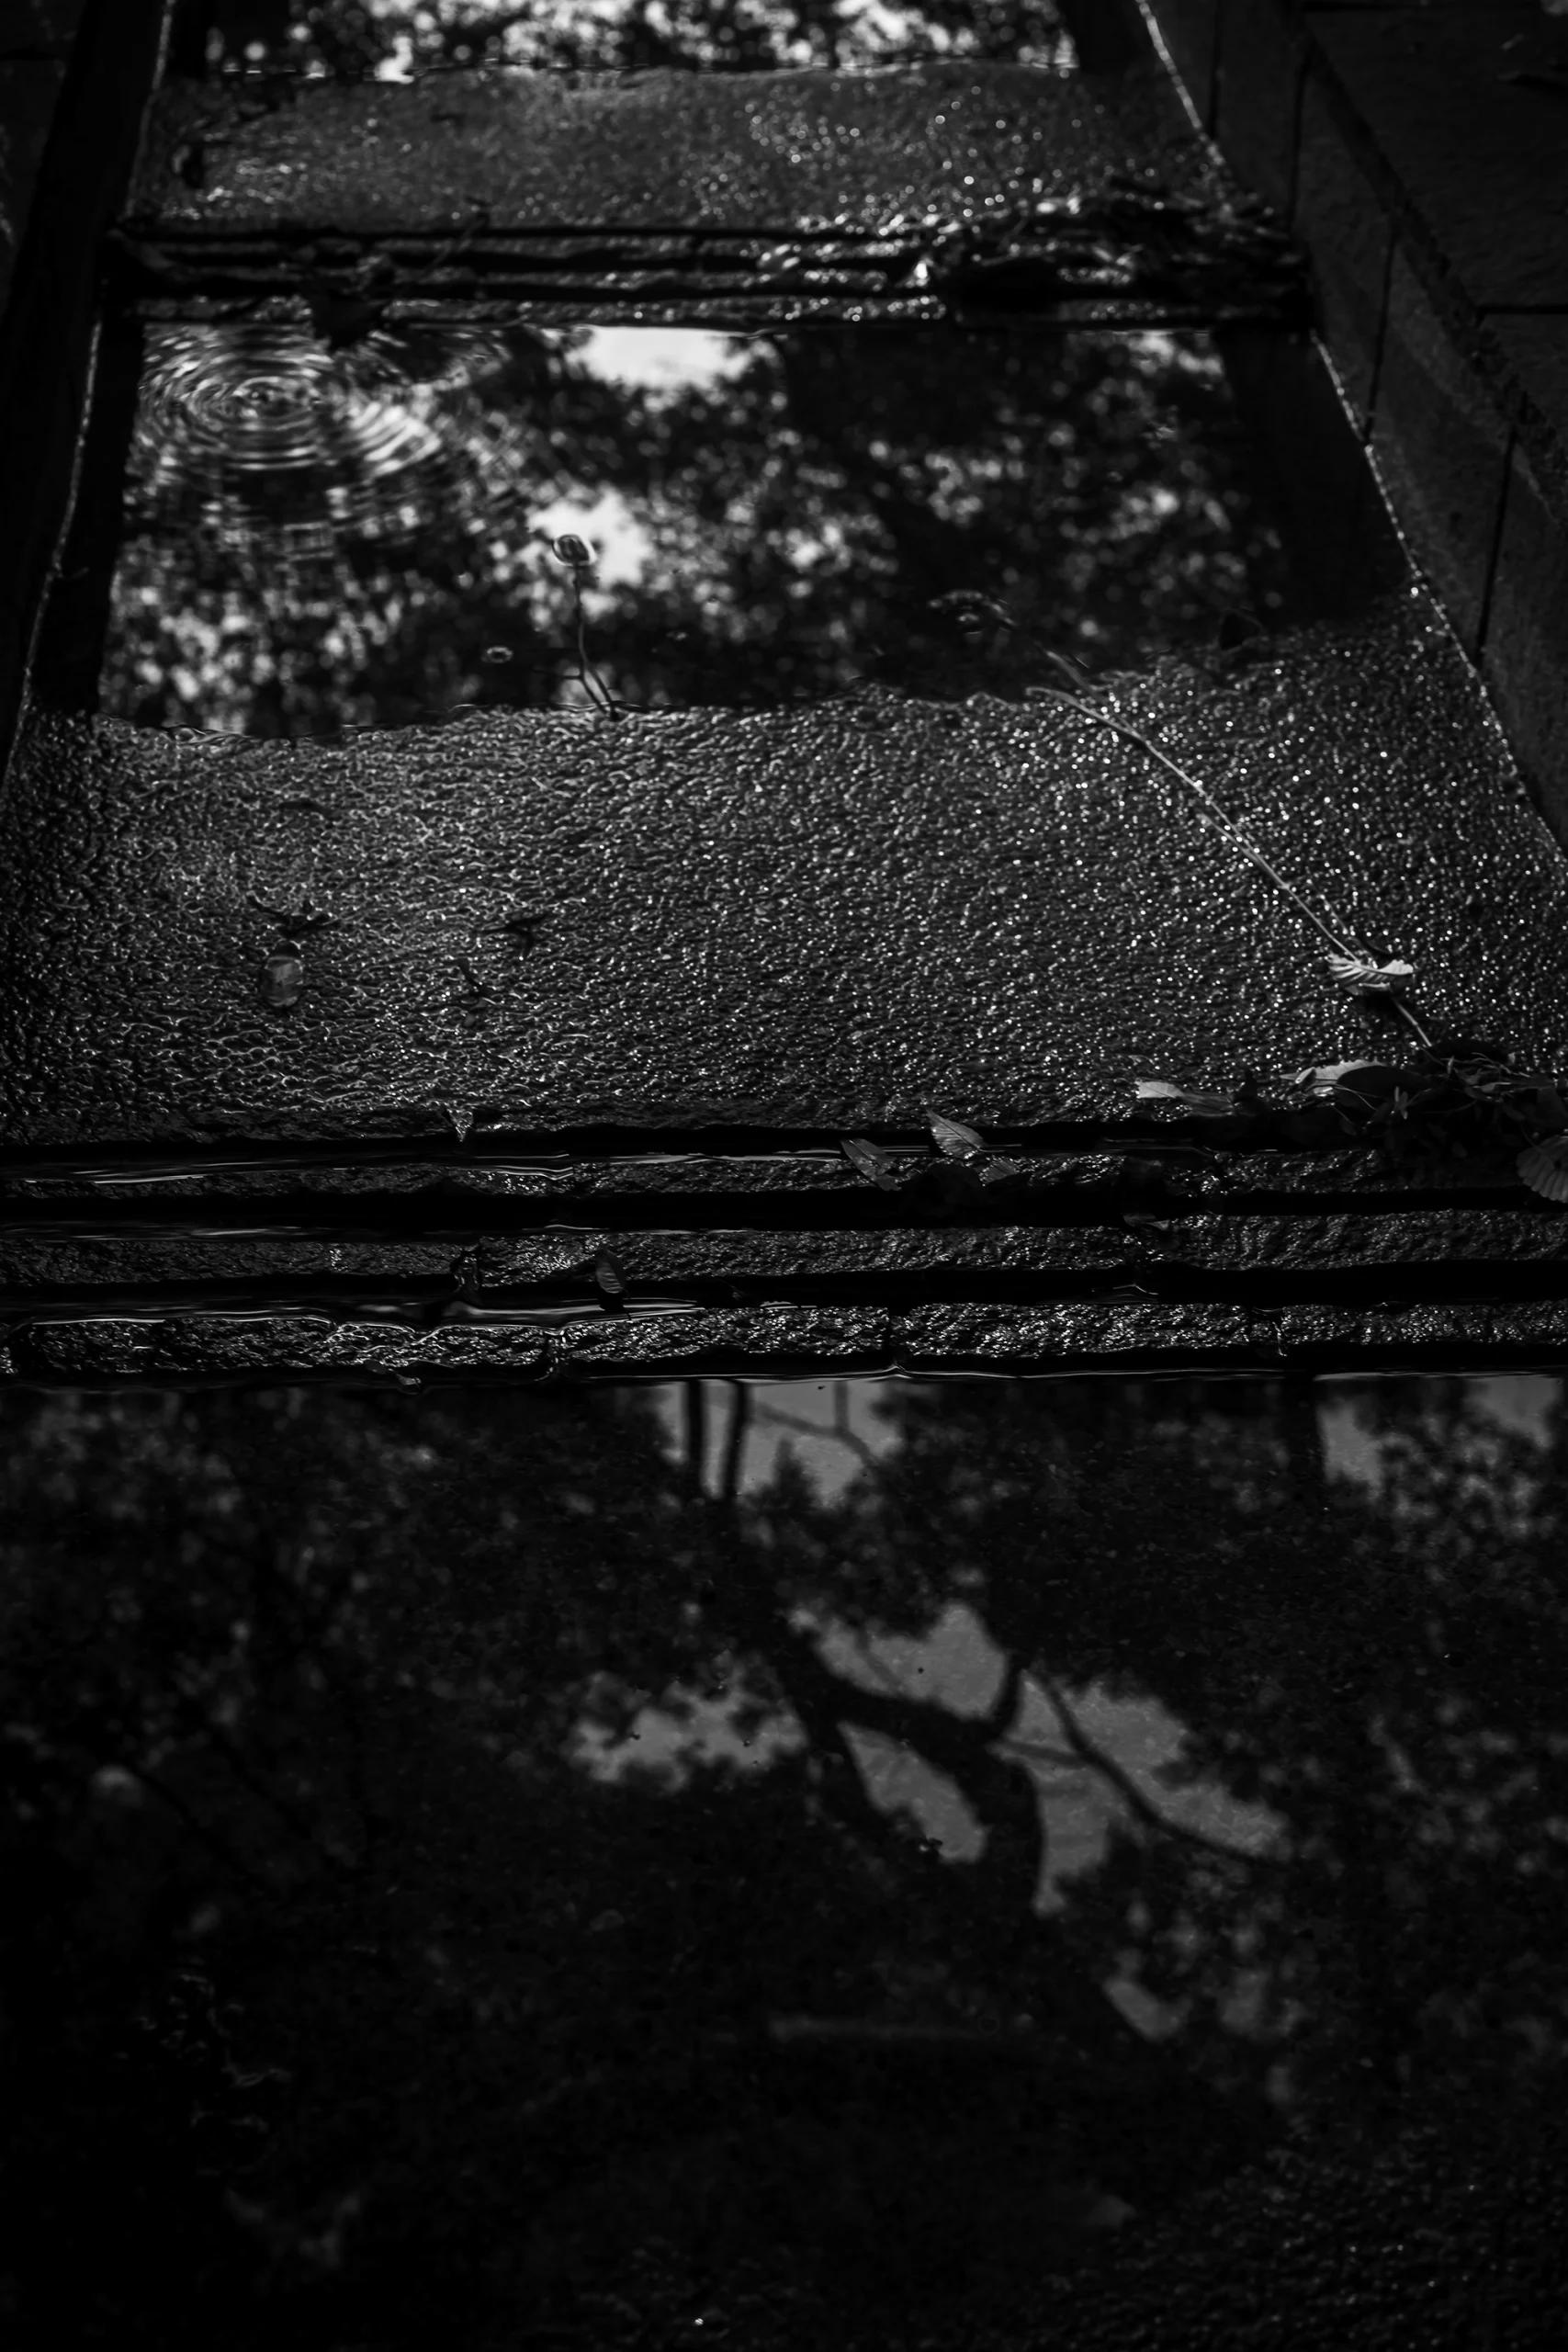
However, the destination of the photo shoot was in a secluded part of the park, an area with large, dense trees, where the footholds are poor and the ground is slippery. The low cooing of mountain pigeons, the sound of running spring water, and the air so cool that it is hard to believe that you are in the same park, the bare nature is left untouched.
In a secluded marshy area, there are signs that read, “Beware of pit vipers! Beware of Wasps! and other disturbing signs are visible in the marshy area.

Fairies playing in the dim light
A little creepy…
There was no sign of people in the park before sunrise.
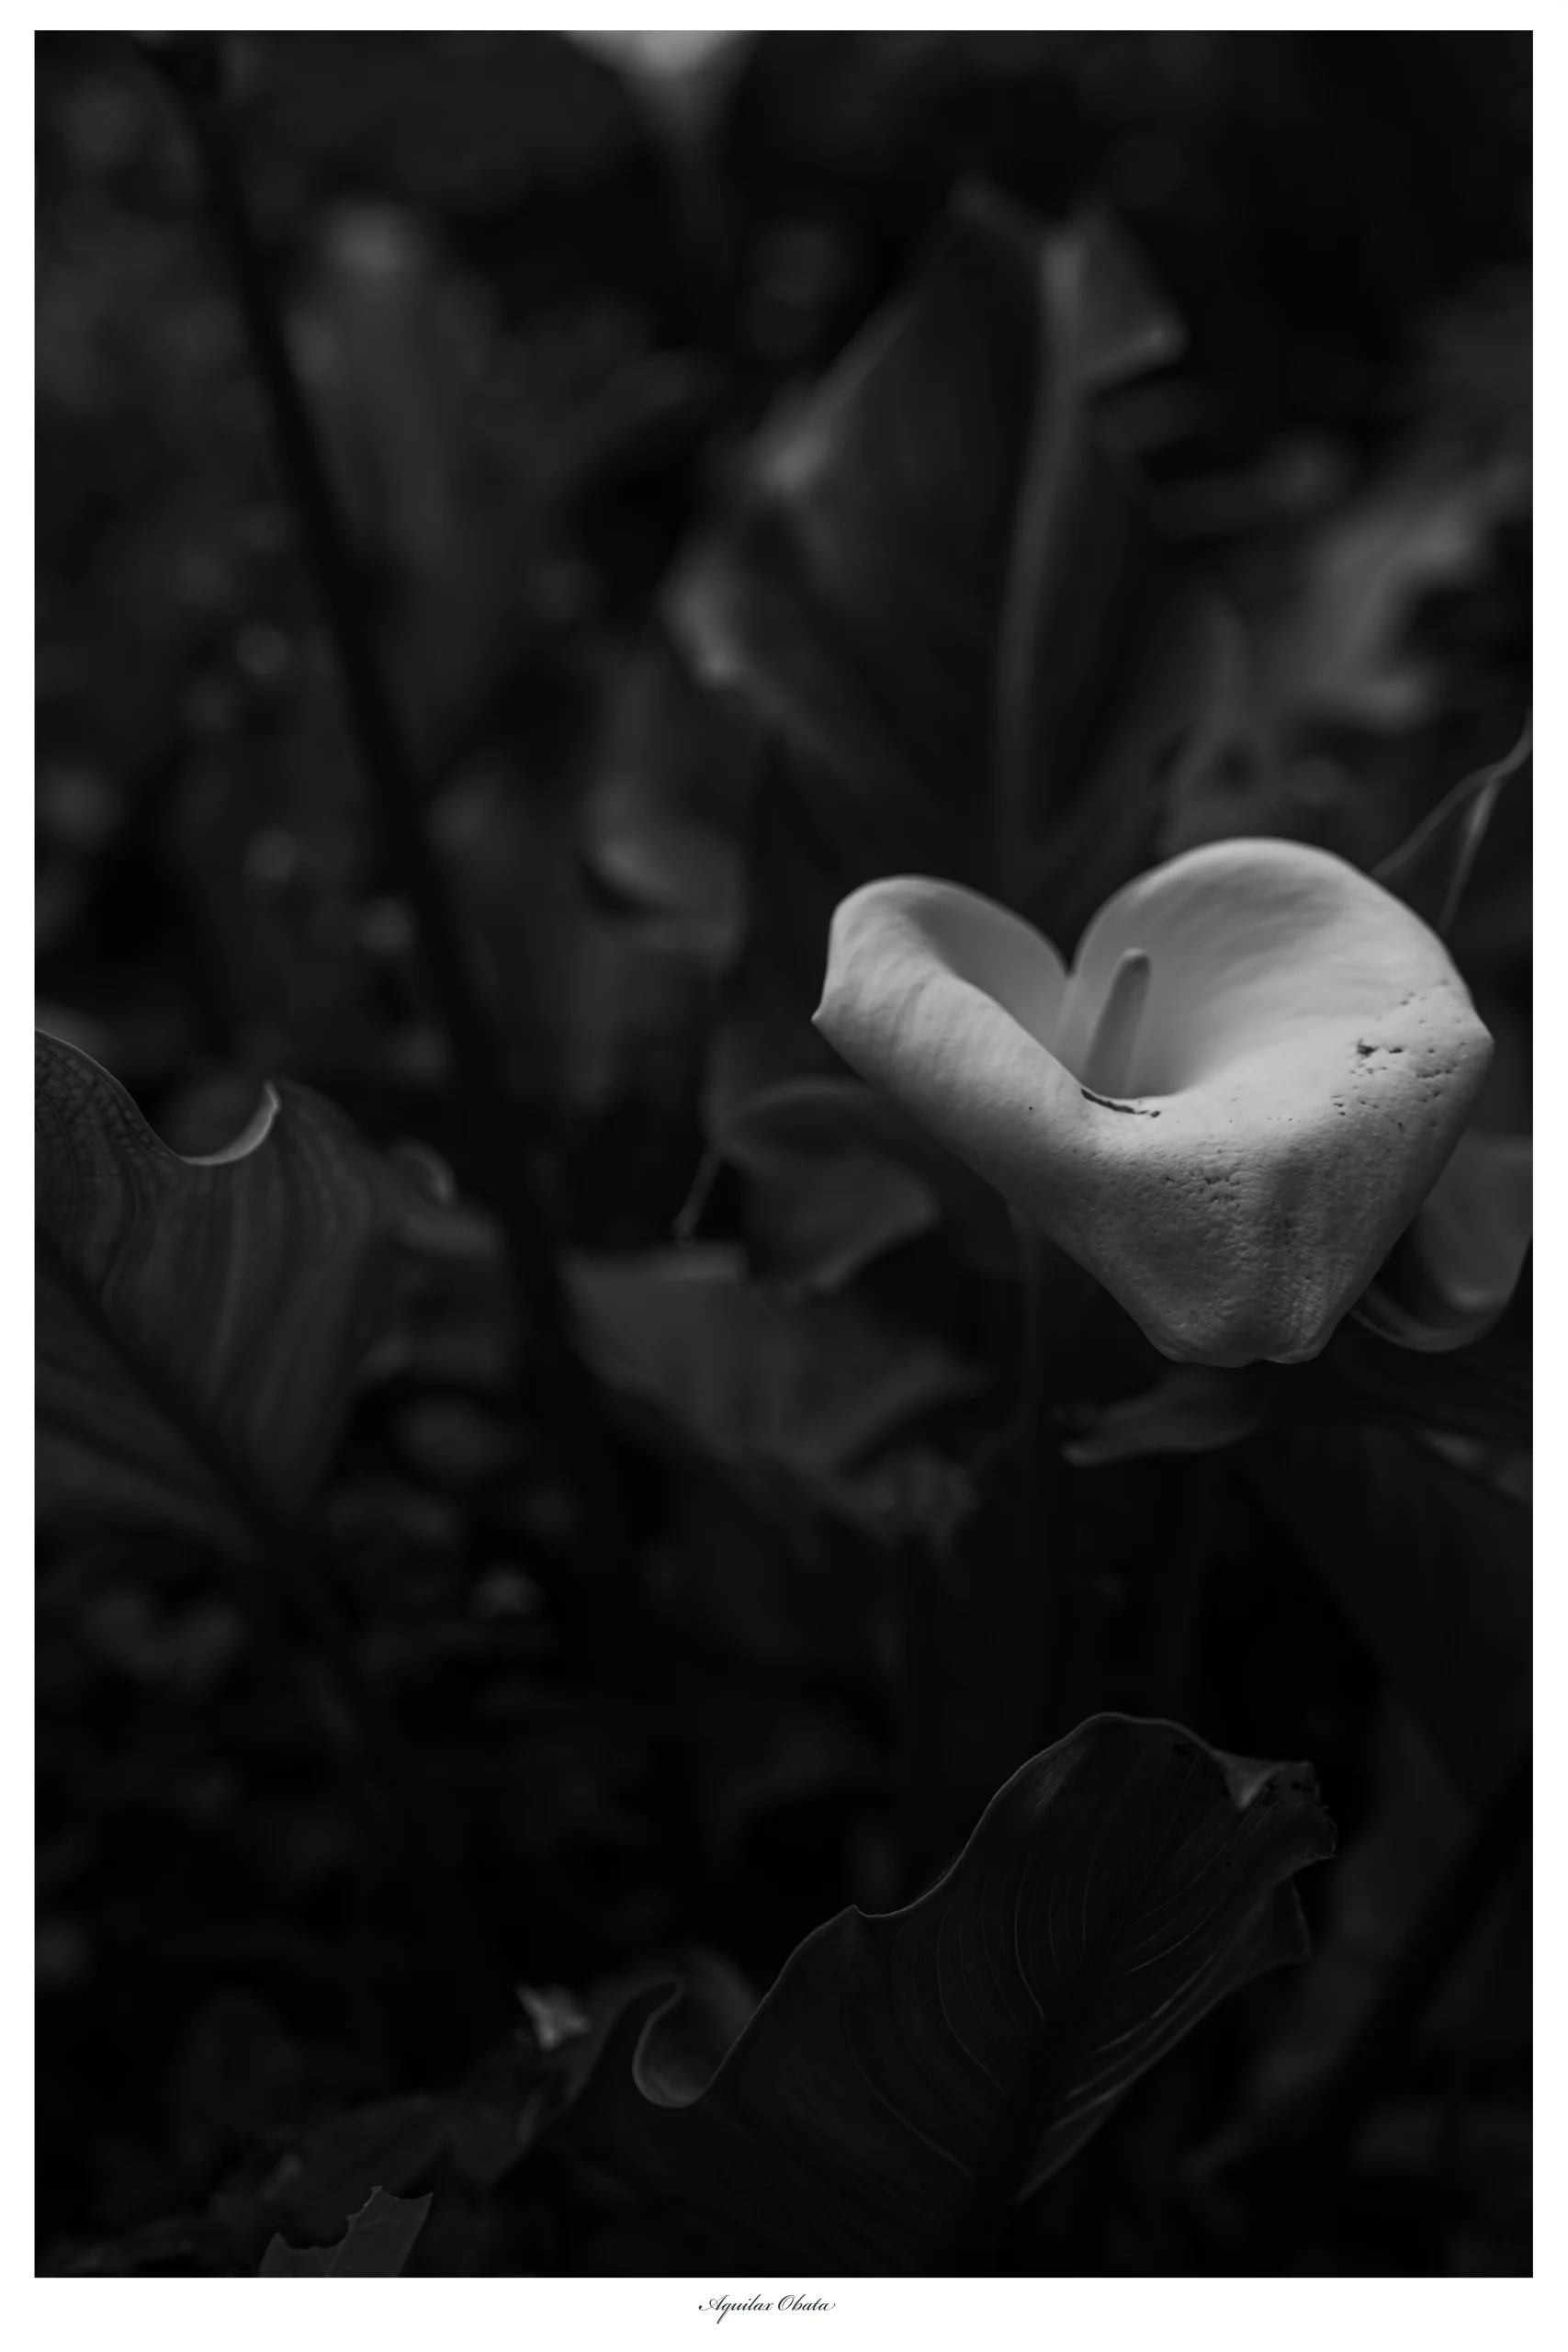
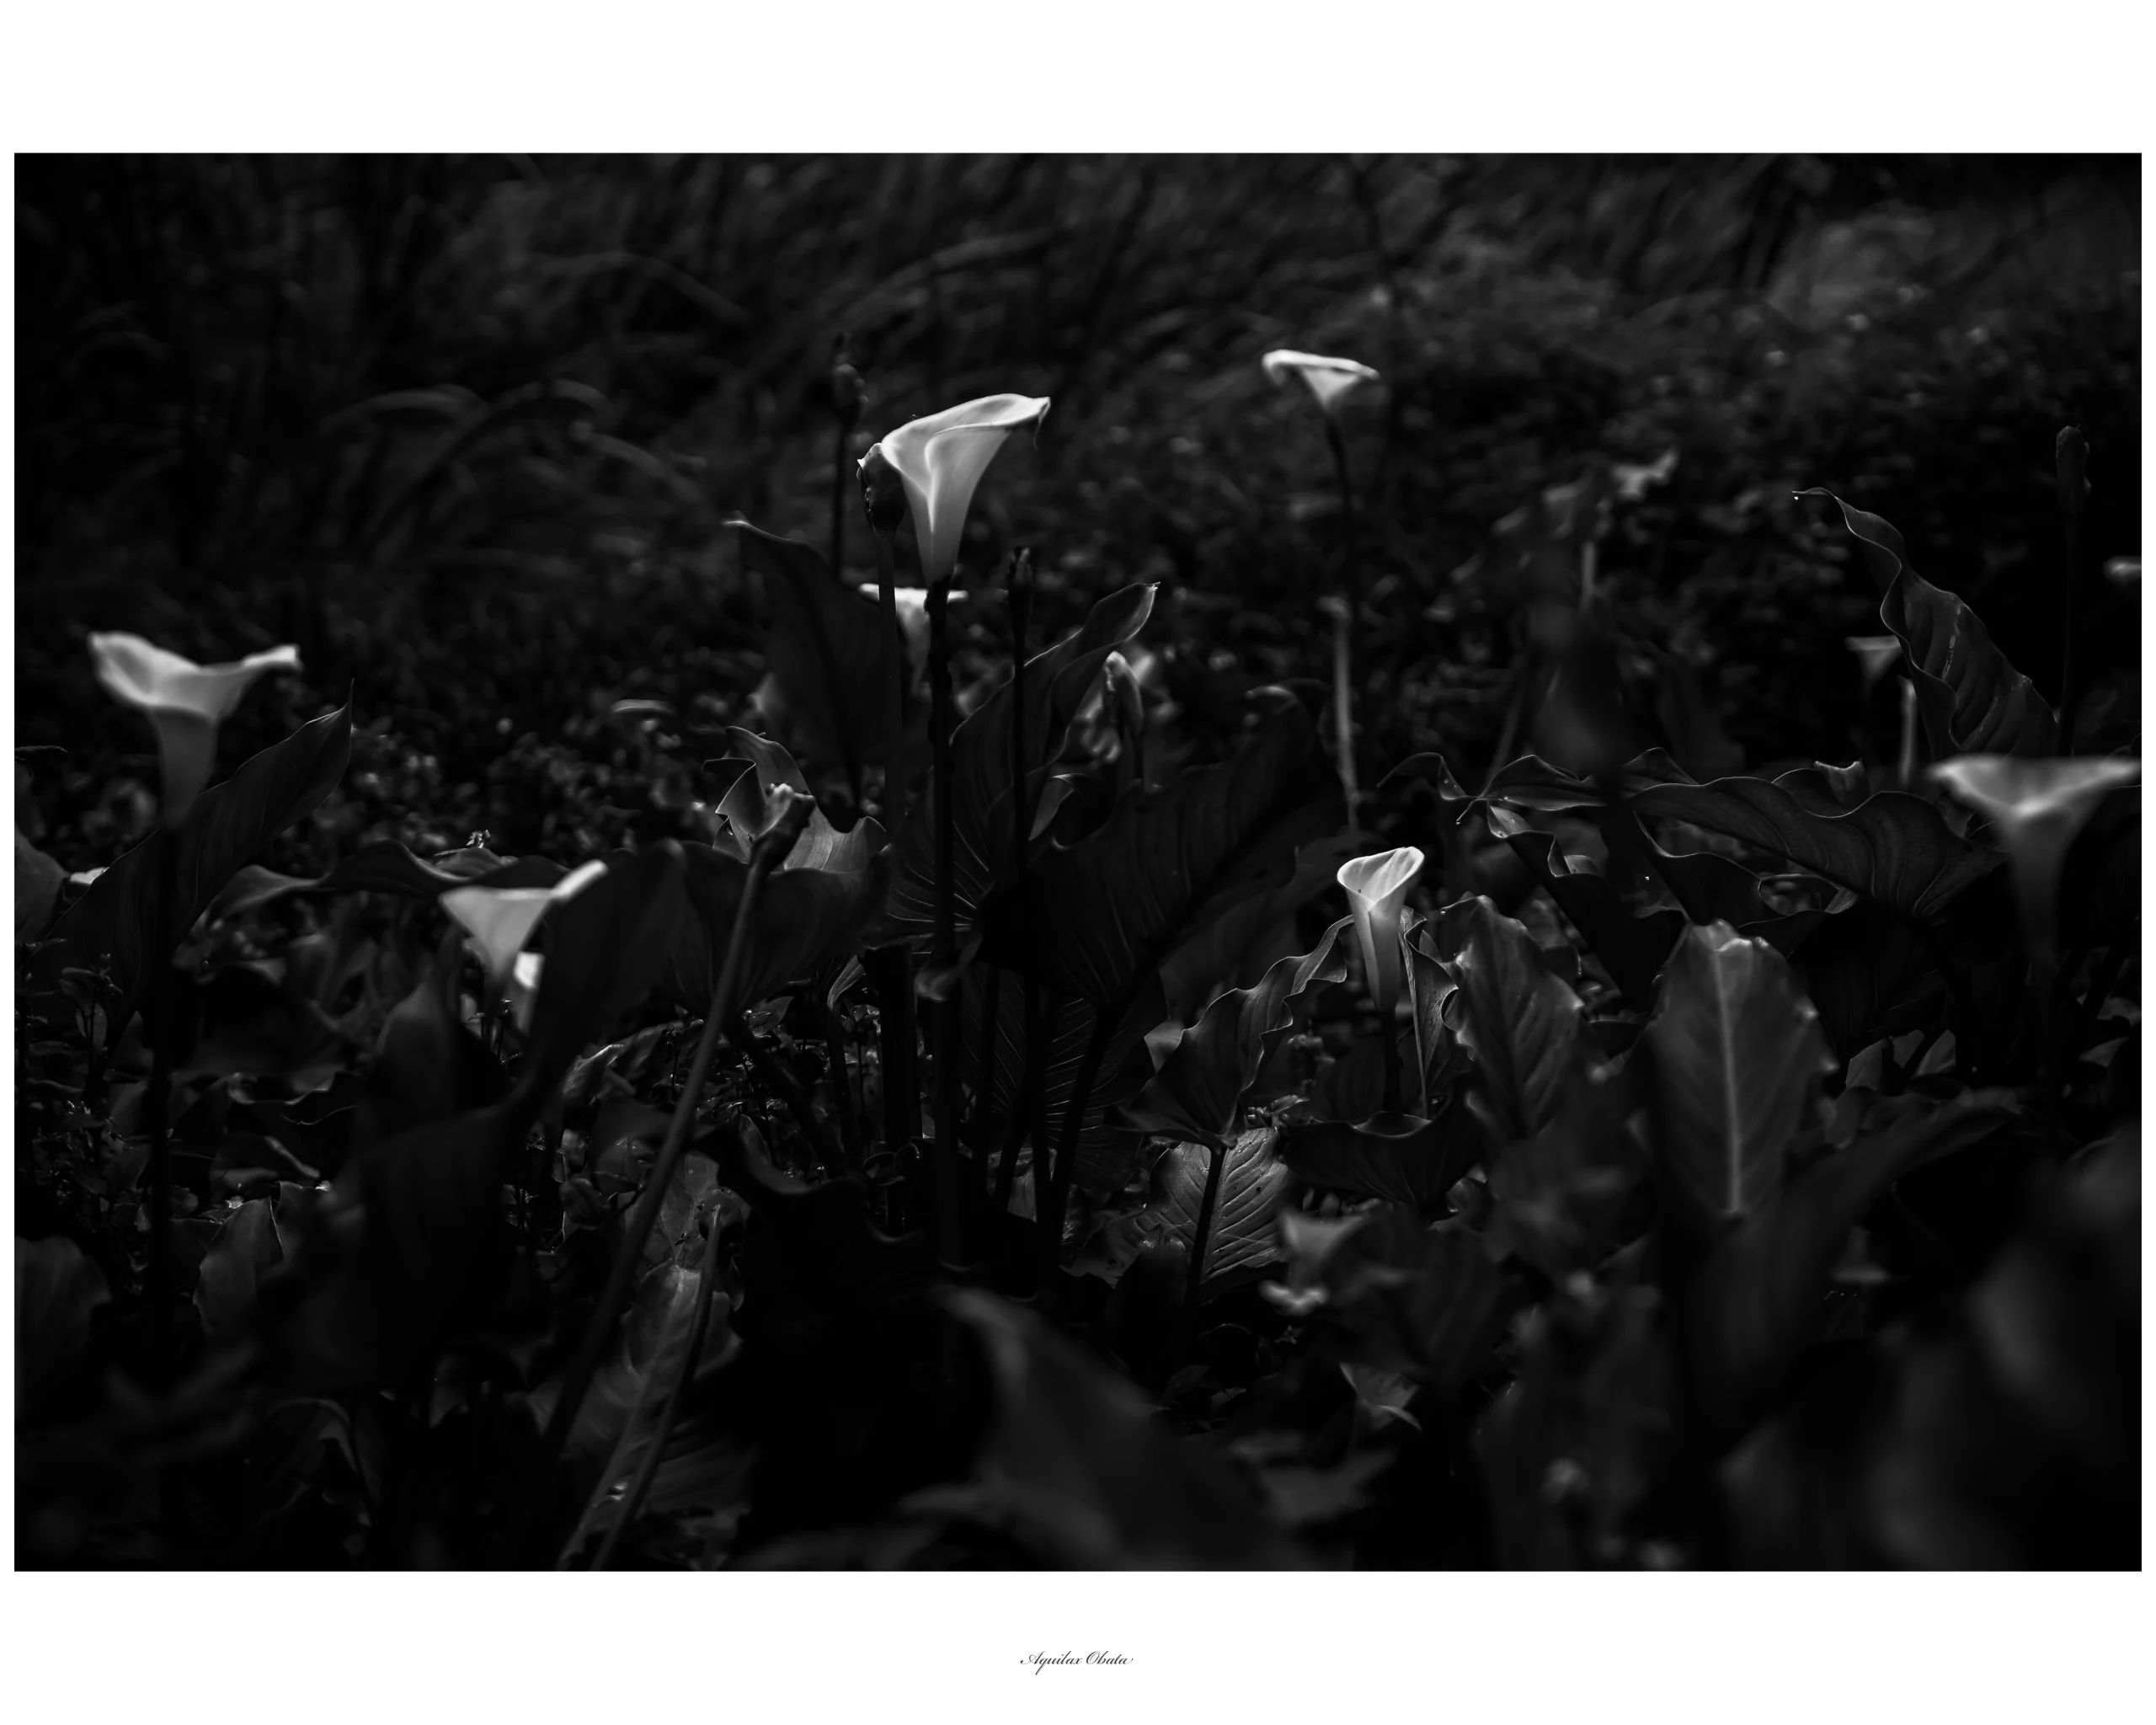
After a few minutes of walking, pure white flowers dotting the bottom of a dense, dimly lit thicket. The white fairies looked sleepy.
I set up my camera with my 50mm lens as close to the fairies as possible, paying close attention to the soft ground that had absorbed water. If I lost my balance, I might slip into the swamp.
Time was ticking away. Precious moments can vanish in an instant if I am too slow.
The serene light in front of me, jet black with the night trailing behind. The white of the angels emerging. I was only able to capture a few shots with the shutter release. But it was a moment in which I was able to feel a solid response in my own way.
Shooting points in the Blue Hour.
This section touches on the various expressions of flowers and plants that can be brought out by adjusting exposure compensation and aperture value in blue hour. In general, the following approaches can be considered.
- Appropriate exposure settings.
– In order to compensate for the lack of light in the blue hour, try to use a moderate overexposure (about +1~2 EV).
– This will bring out the fine textures and three-dimensionality of the grass and flowers. - Adjusting the aperture value
– By stopping down the aperture, you can get a deeper depth of field.
– By stopping down the aperture to around F8 – F11, the foreground flowers and grass and the background will be beautifully out of focus.
– Conversely, using a wide-open aperture can also bring out delicate textures and a three-dimensional effect. - Long time exposure
– Long time exposures of 30 seconds to one minute can be used to express the delicate movement of flowers and grass.
– This allows you to reproduce expressions full of life in still images. - Colour temperature adjustment
-While utilising the blueness of the blue hour, the colours of flowers and grass can be enhanced by adjusting the white balance appropriately.
– If the colour temperature is adjusted slightly towards warmer colours, the warmth of the grass and flowers can be expressed.
– In monochrome photography, “Colour temperature?” This question is discussed below. - Using depth of field
– By stopping down the aperture value, the flowers in the foreground and the background can be clearly separated.
– This allows the subject flowers and grasses to stand out and creates a dense effect.
By combining various methods, such as adjusting exposure, focus and colour temperature settings, you should be able to bring out the best of the flowers and grasses in the right light conditions. I will continue to explore this through trial and error.
- Different time of day for shooting
– The expression of flowers and plants changes depending on the time of day, such as early morning with morning dew or the blue hour at dusk.
– They often have a sleepy, innocent look in the morning and a vibrant look in the evening. - Weather changes.
– The expression of plants and flowers changes dramatically between sunny and cloudy days.
– On sunny days, they have a vigorous look, while on cloudy days they have a calm look.
– After rain, the plants and flowers look revived and radiant. - Differences according to growth stage
– The expression of flowers and plants varies greatly according to their stage of growth: soft at the time of sprouting, gorgeous when in full bloom and melancholy at the beginning of withering. - Effect of wind
– Grasses and flowers swaying in a light breeze have a soft and elegant expression.
– Grass and flowers driven by strong winds, on the other hand, have a tough, robust expression. - Camera angle.
– Looking down from directly above gives an oppressive, dignified expression.
– Looking up from the foot of the plant can give it a strong, rich expression.
Various factors such as time, weather, stage of growth, wind conditions and shooting angle can change the expression of flowers and plants. We believe that flexible thinking in response to the situation will lead to expressive photographs.
What are the camera settings when shooting monochrome during the blue hour?
LUMIX-S, about photo style
With modern digital cameras, you can select various photo styles depending on the subject.
In the case of the LUMIX S1, the following photo styles are preset to suit the shooting conditions.
| STD | standard | Standard shades, with a natural finish with little or no processing. |
| VIVD | vivid | Saturation, high contrast and vivid expression. The effect is to make the subject stand out, allowing you to take photos with impact. |
| NAT | natural | Low contrast, soft expression – natural, true-to-life colour reproduction. |
| FLAT | Flat | Saturation, low contrast. Less exaggerated expression. |
| LAND | Landscape | Vivid expression of blues and greens. |
| PORT | Portrait | Expression with emphasis on healthy skin tones. |
| MONO | Monochrome | Monochromatic expression with colours removed. With standard parameters, monotone photos can be taken in greyscale. |
| L MONO | L Monochrome | Rich gradations. Tight black expression. |
| L MONO D | L Monochrome D | Emphasis on highlights and shadows, expression of dynamic impressions Dramatic atmosphere with emphasis on deep blacks. Shadows are deepened and powerful photos can be taken. For fantastic photos with a sense of gravity and realism |
| CNED | Cinelike | Dynamic range-first gamma curve, for a cinematic feel. Suitable for video recording. |
| CNEV | Cinelike V | Contrast-focused gamma curve for a cinematic feel. |
| 709L | 709Like | Gamma curve equivalent to REC.709, compresses high-luminance areas and suppresses white-out. REC.709 stands for “ITU-R Rcommedation BT.709” – a standard for high-definition broadcasting. |
| STD HLG | standard HLG | Settings for {HLG Photo} shooting. |
| MONO HLG | Monochrome HLG | Settings for shooting {HLG Photo} in monochrome. Capture details clearly and express delicate textures. |
| 2100 HLG | 2100Like HLG | Settings for shooting HLG format video. |
| MY | MY PHOTO STYLE 1〜 MY PHOTO STYLE 10 | You can adjust the parameters of each photo style to your liking and register it as your own unique photo style. |
As described above, 15 different styles are preset. If you add ‘MY PHOTO STYLE’ to the list, 25 photo styles can be selected instantly.
More concrete ways of using each of these will be covered in detail in future editions of this blog.
For this article, we will limit ourselves to the range applied when taking the title photo.
This time the L MONO D was customised.
From the list above, this time I chose L MONO D, the ninth in the list.
However, I felt that I needed to adjust the parameters in order to capture a fantastic and realistic image of a white flower floating like a phantom in the low light before dawn.
When ‘L MONO D’ is selected, the following parameters can be adjusted respectively.
| contrast | -5 〜 +5 | 20 steps. |
| Highlights. | -5 〜 +5 | 20 steps. |
| Shadows | -5 〜 +5 | 20 steps. |
| Hue | -5 〜 +5 | 20 steps. |
| Filters | Yellow, orange, red, green, OFF. | 5 types |
| Grain | LOW,STD,HIGH,OFF | 4 steps. |
| Sharpness | -5 〜 +5 | 20 steps. |
| Noise reduction | -5 〜 +5 | 20 steps. |
Contrast, highlights and shadows do not need any particular explanation.
What I would like to mention here in particular is ‘hue’.
Many people seem to be surprised at the idea of hue adjustment in monochrome.
In my case, I am more or less obsessed with Japanese black, where black = sumi = jet black.
I believe that black is not simply K100% black.
If I start talking about black, it would be enough to write a whole article, so I’ll leave that for another article.
Parameters for ‘L MONO D’ during blue hour photography.
Specifically, they are as follows. We do not consider these to be the best. I am sure that some of you will have even more precise opinions. These are only figures based on my experience.
There are two points to note with this parameter.
1.Hue; for monochrome photography, the hue is warm black (warm black) for negative values. If it is positive, a cold black (cold black) can be expressed. I wanted to express the feeling of cool air in the morning mist, so I set it to +2, a slightly cool black.
2.The orange filter effect was chosen to offset the faint reddish pre-dawn reflections in the monochrome expression, as we wanted to slightly increase the clean white of the flowers.
| contrast | +5 |
| Highlights. | 0 |
| Shadows | 0 |
| Hue | +2 |
| Filters | OR |
| Grain | LOW |
| Sharpness | -5 |
| Noise reduction | 0 |
Today’s Summary
As I mentioned earlier, I don’t believe that the current parameters are the definitive solution for expressing the concept of “black” for Japanese people. It’s merely one of my approaches to the possibilities of black.
Even the combination of parameters for just one of LUMIX’s photo styles, “L MONO D,” can result in 1.2 billion different variations.
Depending on one’s perspective, it might be sufficient to simply use the camera’s built-in AI or S modes for shooting. Even then, the camera can produce excellent results. However, I feel that the potential of advanced digital cameras is truly limitless.
The interplay between digital and manual control is what makes it so fascinating.
Photography (1)
Photography (2)
June.2024
P1020395
📷LUMIX-S, LUMIX S PRO 1:1.4/50mm f2.2, SS:1/200, ISO 100
はじめに
6月12日のブログ『Mountain hydrangea in the Blue Hour』では日の出前のブルーアワー、日本固有の山紫陽花の青の深さに迫れるか?それがテーマでした。
今日はブルーアワーでのモノクローム撮影について書くことにします。
剥き出しの自然
撮影場所は森林公園の奥まった一角、自宅から10分ほど歩いた緑地帯です。
園内はゆっくり散策すると30分ほど、ここは生活圏内の貴重なエリアです。
樹木に囲まれ、静寂に包まれた高低差のある園内には子供たちが遊べる広場や噴水池など、晴れた日は親子連れで賑わう公園です。
しかし撮影の目的地は公園の奥まった場所、鬱蒼とした大木が茂るそのエリアは足場が悪く地面は滑りやすい。山鳩の低い鳴き声、湧水の流れる音、同じ公園内とは思えないほど空気がひんやりと感じられ、剥き出しの自然が残されています。
奥まった湿地帯には「マムシに注意!」「スズメバチ注意!」、物騒な立て看板が目につく。
薄暗闇に遊ぶ妖精たち
ちょっと不気味・・・
日の出前の園内に人の気配はない。
歩くこと数分、鬱蒼とした薄暗い雑木林の底に点々と浮かび上がる純白の花々。白い妖精たちは眠たげな表情だ。
水を吸い込んだ柔らかい地面に注意を凝らし、50mmレンズで可能な限り妖精たちに近づき、カメラを構えた。バランスを失うと沼地に滑り込んでしまいそうだ。
時間は刻一刻と進んでいる。貴重な一瞬はモタモタしていると一瞬で消え去ってしまう。
目の前の静謐な光、夜を引きずった漆黒。浮かび上がる天使たちの白。シャッターを切れたのはわずか数枚だった。しかし自分なりに確かな手応えを感じることのできた一瞬でした。
ブルーアワーでの撮影ポイント
ブルーアワーでの露出補正や絞り値の調整によって、草花のさまざまな表現が引き出せることについて触れます。一般的には以下のようなアプローチが考えられます。
- 適切な露出設定
- ブルーアワーの光量不足を補うため、適度な露出補正(+1~2EVくらい)を心がける。
- これにより、草花の細かな質感や立体感が引き立ちます。 - 絞り値の調整
- 絞りを絞り込むことで、被写界深度を深くとることができます。
- F8~F11程度に絞ることで、前景の草花と後景のボケが美しくなります。
- 逆に開放絞りにすることで、繊細な質感や立体感を引き出すこともできます。 - 被写界深度の活用
- 絞り値を絞り込むことで、前景の草花と背景がクリアに分離されます。
- これにより、主題の草花を浮き立たせることができ、密度の高い演出が可能になります。
- 撮影時間帯の違い
- 朝露のある早朝や、夕暮れのブルーアワーなど、時間帯によって草花の表情は変わります。
- 朝は眠たげで清楚な表情、夕方は活力に満ちた表情になることが多いです。 - 天候の変化
- 晴れの日と曇りの日では、草花の表情が大きく変わります。
- 晴れの日は勢いのある表情、曇りの日はおだやかな表情になります。
- 雨上がりは、草花がよみがえったような輝きを放っています。 - 生育段階による違い
- 新芽の頃は柔らかな表情、満開時は華やかな表情、枯れ始めは哀愁の表情など、生育段階によって草花の表情は大きく変化します。 - 風の影響
- 微風に揺らめく草花は、やわらかで優雅な表情を見せます。
- 強風に煽られている草花は、逆にタフで逞しい表情になります。 - カメラアングル
- 真上から見下ろすと、圧迫感のある凛とした表情になります。
- 足元から見上げると、力強く豊かな表情を見せることも。
時間や天候、生育段階、風の状態、撮影アングルなど、さまざまな要素が草花の表情を変化させます。状況に応じた柔軟な発想が、表情豊かな写真につながるのではないかと考えています。
ブルーアワーにモノクローム撮影する時のカメラ設定は?
LUMIX-S、フォトスタイルについて
最近のデジタルカメラであれば被写体に応じて様々なフォトスタイルが選択できます。
LUMIX S1の場合次のように撮影条件に適したフォトスタイルがプリセットされています。
| STD | スタンダード | 標準的な色合いで、ほとんど加工をしていない自然な仕上がりになります |
| VIVD | ヴィヴィッド | 彩度、コントラスト高め、鮮やかな表現 被写体を際立たせる効果があり、インパクトのある写真が撮れます |
| NAT | ナチュラル | コントラスト低、柔らかい表現 - 自然で忠実な色再現 |
| FLAT | フラット | 彩度、コントラスト低め。誇張の少ない表現 |
| LAND | 風景 | 青、緑が鮮やかな表現 |
| PORT | 人物 | 健康的な肌色を重視した表現 |
| MONO | モノクローム | 色味を抜いた単色表現 標準のパラメータの場合、グレースケールでモノトーンの写真が撮影できる |
| L MONO | Lモノクローム | 階調が豊か。黒の引き締まった表現 |
| L MONO D | LモノクロームD | ハイライト、シャドウを強調、ダイナミックな印象の表現 深い黒が強調されたドラマチックな雰囲気 シャドウの部分に深みが出て、迫力のある写真が撮れる 重厚感と臨場感のある幻想的な写真に |
| CNED | シネライクD | ダイナミックレンジ優先したガンマカーブ、映画的感覚に仕上げる 動画撮影時に適している |
| CNEV | シネライクV | コントラスト重視したガンマカーブ、映画感覚に仕上がる |
| 709L | 709ライク | REC.709相当のガンマカーブ、高輝度部分を圧縮して白飛びを抑える。 REC.709とは「ITU-R Rcommedation BT.709」の略-ハイビジョン放送の規格です |
| STD HLG | スタンダードHLG | {HLGフォト}撮影するための設定 |
| MONO HLG | モノクロームHLG | {HLGフォト}をモノクロームで撮影するための設定 細部までクリアに捉えられ、繊細な質感を表現できる |
| 2100 HLG | 2100ライクHLG | HLG方式の動画を撮影するための設定 |
| MY | MY PHOTO STYLE 1〜 MY PHOTO STYLE 10 | それぞれのフォトスタイルを好みに合わせてパラメータを調整し、自分独自のフォトスタイルとして登録できる。 |
以上のように15種類のスタイルがプリセットされています。さらに「MY PHOTO STYLE」を加えると25のフォトスタイルが瞬時に選択可能になります。
それぞれのより具体的な活用方法については、今後、このブログ内で詳しく取り上げていきます。
今回は表題の写真撮影時に適用した範囲に留めることにします。
L MONO Dをカスタマイズする
上の一覧の中から今回私が選んだのは9番目の「L MONO D」です。
しかし夜明け前の微弱な光の中で、幻のように浮かんだ白い花を幻想的かつリアリティあるイメージで撮影するにはパラメータの調整が必要だと感じました。
「L MONO D」を選択すると、それぞれ次のパラメータ調整が可能になります。
| コントラスト | -5 〜 +5 | 20段階 |
| ハイライト | -5 〜 +5 | 20段階 |
| シャドー | -5 〜 +5 | 20段階 |
| 色相 | -5 〜 +5 | 20段階 |
| フィルター | イエロー、オレンジ、レッド、グリーン、OFF | 5種類 |
| 粒状 | LOW,STD,HIGH,OFF | 4段階 |
| シャープネス | -5 〜 +5 | 20段階 |
| ノイズリダクション | -5 〜 +5 | 20段階 |
コントラスト、ハイライト、シャドーについては特に説明の必要はないと思います。
ここで特に触れたいのは「色相」についてです。
モノクロームに色相調整というと、多くの方が意外に思われるようです。
私の場合、黒色=墨=漆黒といった、日本の黒ということについて多少なりとも拘りがあります。
黒は単にK100%が黒ではない、そのように考えています。
黒について語り出すと、それだけでひとつの記事が成立しそうですので、それは稿を改めることにして、今回は暖かい黒と冷たい黒ということに留めます。
ブルーアワー撮影時の「L MONO D」のパラメータ
具体的には次のとおりです。これが最善とは考えていません。皆さんの中にはさらなる的確なご意見があることでしょう。あくまでも私の経験値による数値です。
今回のパラメータで注意すべき点は2つです。
1、色相について;モノクローム撮影時の色相はマイナス値の場合、暖かい黒(温黒色)。プラス値の場合冷たい黒(冷黒色)を表現できます。朝靄の中、冷んやりした空気感を表現したいと考え、+2やや冷たい黒に設定しました。
2.フィルターのオレンジは花の清楚な白色の白度を若干高めたいと考え、モノクローム表現において微かに感じられた夜明け前の赤っぽい反射光を相殺させるため、オレンジのフィルター効果を選びました。
| コントラスト | +5 |
| ハイライト | 0 |
| シャドー | 0 |
| 色相 | +2 |
| フィルター | オレンジ |
| 粒状 | 弱 |
| シャープネス | -5 |
| ノイズリダクション | 0 |
今日のまとめ
先ほど述べたように、今回のパラメータが日本人にとっての黒を表現するための正しい解答だとは思っていない。黒の可能性に対する私なりのアプローチのひとつに過ぎないだろう。
LUMIXのフォトスタイルの一つ「L MONO D」のパラメータの組み合わせだけでも12億通りもあるのだから。
考え方によってはカメラが標準装備しているAiやSモードで撮影すればそれで済むことかもしれない。それでもカメラは素晴らしい結果を出してくれる。しかし私は高機能化したデジタルカメラの可能性は無限だと感じている。
デジタルとマニュアルとの相剋ということが面白いのだ。